

You’re surrounded by an amazing team of creatives. You’ve had approval on creating content to drive results. You’ve got a vision in your head, motivation in your soul and you’re raring to go. But where do you start?
There’s more moving parts than an antique grandfather clock.
Missed deadlines and cries of I didn’t know that was my responsibility are lurking in the background.
Fear not, you marvellous marketer, with a bit of planning and a foolproof workflow, you’ll be content management zero to hero quicker than Sam Altman got re-hired.
Table of Contents
A content workflow that counts
Content production without a workflow is like sailing without a map.
How to create a content workflow.
Define your goals, audience and team
Top tips for managing your content workflow
A content workflow that counts
Creating and following a workflow gets a piece of content from an idea in someone’s head, to a published piece in all its glory, for the world to see.
The execution of a great workflow ensures that everyone working on the project knows exactly what’s expected of them, and by when. It brings visibility to the entire team and by doing so enables real time progress updates accessible to all, and reduces bottlenecks.
Not only does it mean things get done on time, but it gives structure and quality control to everything you work on. With this new found structure and clarity, you’ll find yourself with a more efficient and collaborative team as well as consistent, higher quality and faster results. Who doesn’t want that?
The workflow and steps involved will vary slightly depending on the content type, but the basics of this article can very easily be adapted to any type of content.
To get a better understanding of why it’s so important to create a content workflow, l asked the head of account management at Flying Cat, Pilar Suquilvide, for her expert opinion. Not only has she progressed from Project Manager to Head of Account Management at Flying Cat in 3 years, but she also writes her own successful travel blog. If anyone knows the impact of creating a content workflow, it’s her.
Pilar says: “Even if you’re a single content marketer, a content workflow helps. If you’re part of a team, even just 2 people, you can’t live without one if you want to avoid missed deadlines and lack of ownership.”
Content production without a workflow is like sailing without a map.
A content workflow serves as a structured roadmap, guiding the journey from idea to publication. Without it, the process risks becoming a chaotic voyage that lacks synergy and efficiency across the team members involved.
Just as sailors rely on a map, content creators depend on a workflow for seamless navigation through ideas, approvals, creation, and delivery, as Pilar exaplains.
How to create a content workflow.
Step 1: Define your stakeholders roles & responsibilities
Step 2: Determine at what stages you’ll need approval and by who
Step 3: Give each step of the content creation process a time estimate and a due date
Step 4: Add the steps of the content creation process to your project management tool. Make life easy for yourself and create a template that you can deploy each and every time.
Step 5: Identify recurring or future dates and create tasks for those eg. Check performance, re-optimize and re-purpose the content
Step 6: Add automations to your workflow to cut down on manual, repetitive work and earn yourself 5 stars in the efficiency ranking championship.
Let’s dive further into a couple of these steps.

SEO & content marketing ops, ready to scale
Expertly crafted SOPs & templates for efficient processes and top-quality output.
Define your stakeholders roles & responsibilities
Beginning with the end in mind means you can break the bigger picture down into smaller steps and delegate. You’ll want to make sure you have the team that you’ll need in place and available, and everyone knows exactly what’s expected of them.
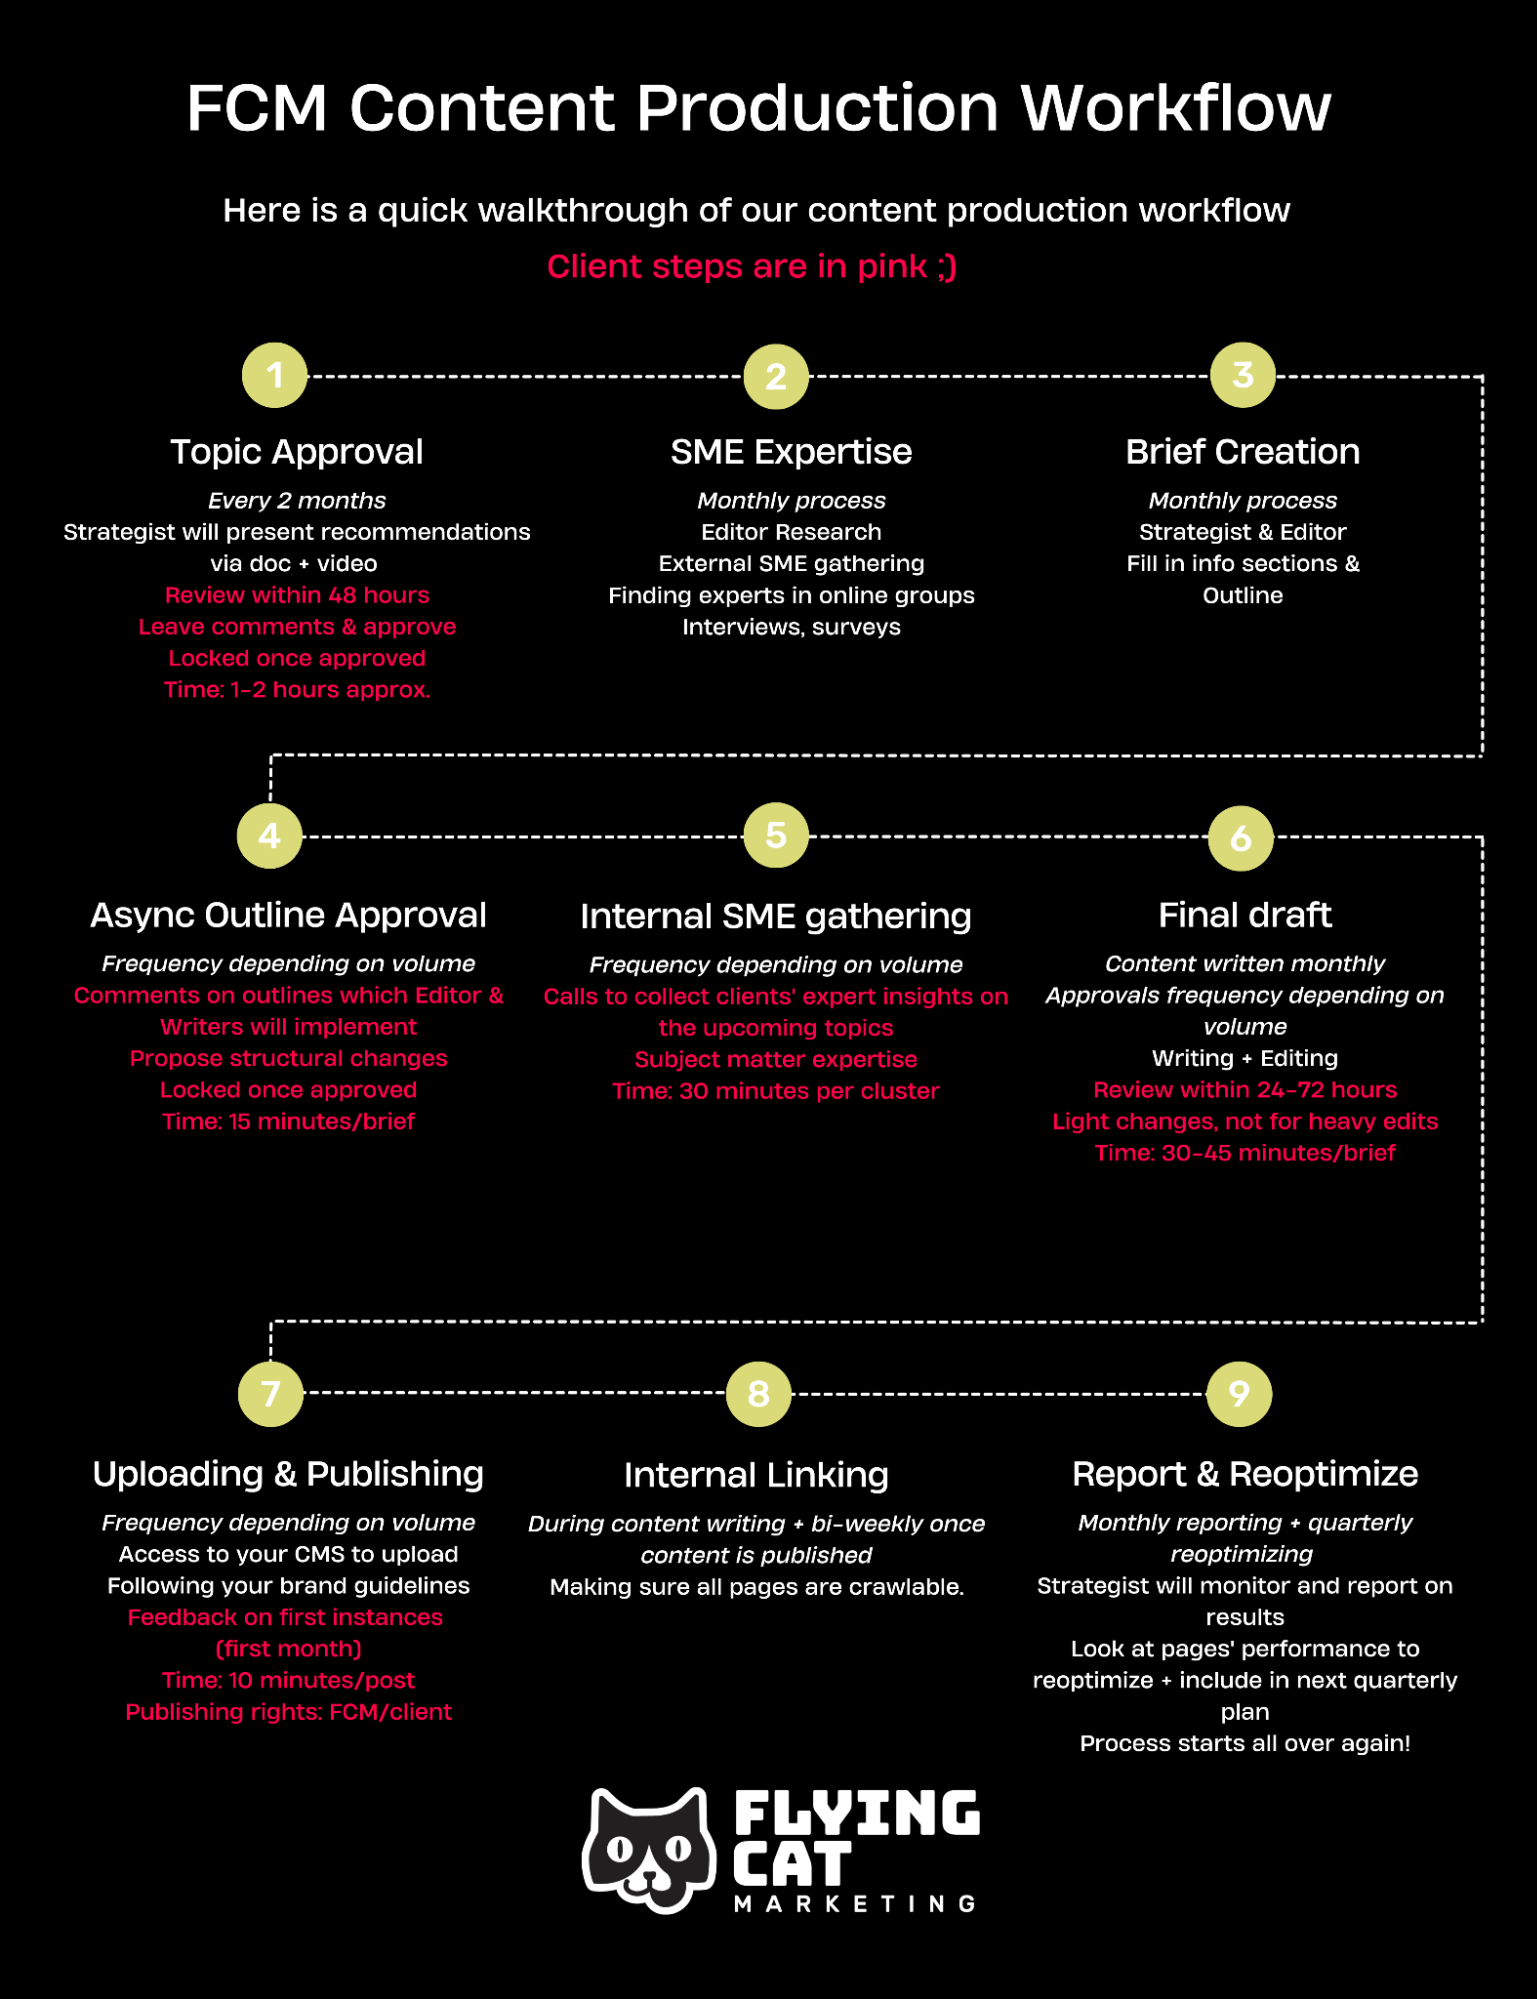
The content creation process
Here’s a visual example of our content production workflow at Flying Cat. Each stage is represented in our project management system as a subtask with a due date, a time estimate and an assignee. This is a huge part of the overall workflow and you’ll need to determine the stages, owners and estimated times of each of these steps before you can slot everything else in.
Approval stages
Chances are there’s one or more rounds of approvals needed in the content creation process before your work of art is having an impact on the world.
Make sure you’re clear on exactly who needs to approve what at each stage, and how long each approval is expected to take.
Be clear on types of approval and feedback you’re expecting, too. For example, at outline approval stage you might accept structural changes, granular requests and adjusting H2s and H3s. At final draft stage you’re probably only asking for slight changes to wording here and there.
There’s nothing more infuriating than ending up at the final draft stage when your writer has spent hours delivering their best work and the final approver tells you they didn’t realize they were meant to give significant feedback at the outline stage, and in fact the whole piece has gone completely west.
Head banging against a brick wall, anyone?
Avoid this by letting everyone know at the start of the project what types of feedback they can give at what stage. If they miss their chance to approve something you’ll want to have some boundaries in place that mitigate your entire team wasting their time.
Time estimates and due dates
If you can get even a rough estimate on the amount of time you think each stage of the creation process will take, you’ll be on to a winner.
Of course, these will never be exact, but having a ballpark figure helps you plan resources, timelines and manage the expectations of your clients and the team.
At the risk of stating the obvious, due dates are one of the most important aspects of the whole workflow because, well, if you have no due date you’ll have no published content.
They’re even more important at every stage when there are many different stakeholders involved.
Each person needs to be held accountable for meeting their deadlines and a project manager has the responsibility of keeping a project on track and moving dates along.
Tools and templates
You can have the best memory and all the discipline and processes in the world, but if you don’t have a central location where you store and track everything that you and your team are working on, you might as well be throwing dollar bills into thin air.
Even if you have the most organized team on the planet, not downloading information and updates from everyone’s head is a cardinal sin in the world of content production.
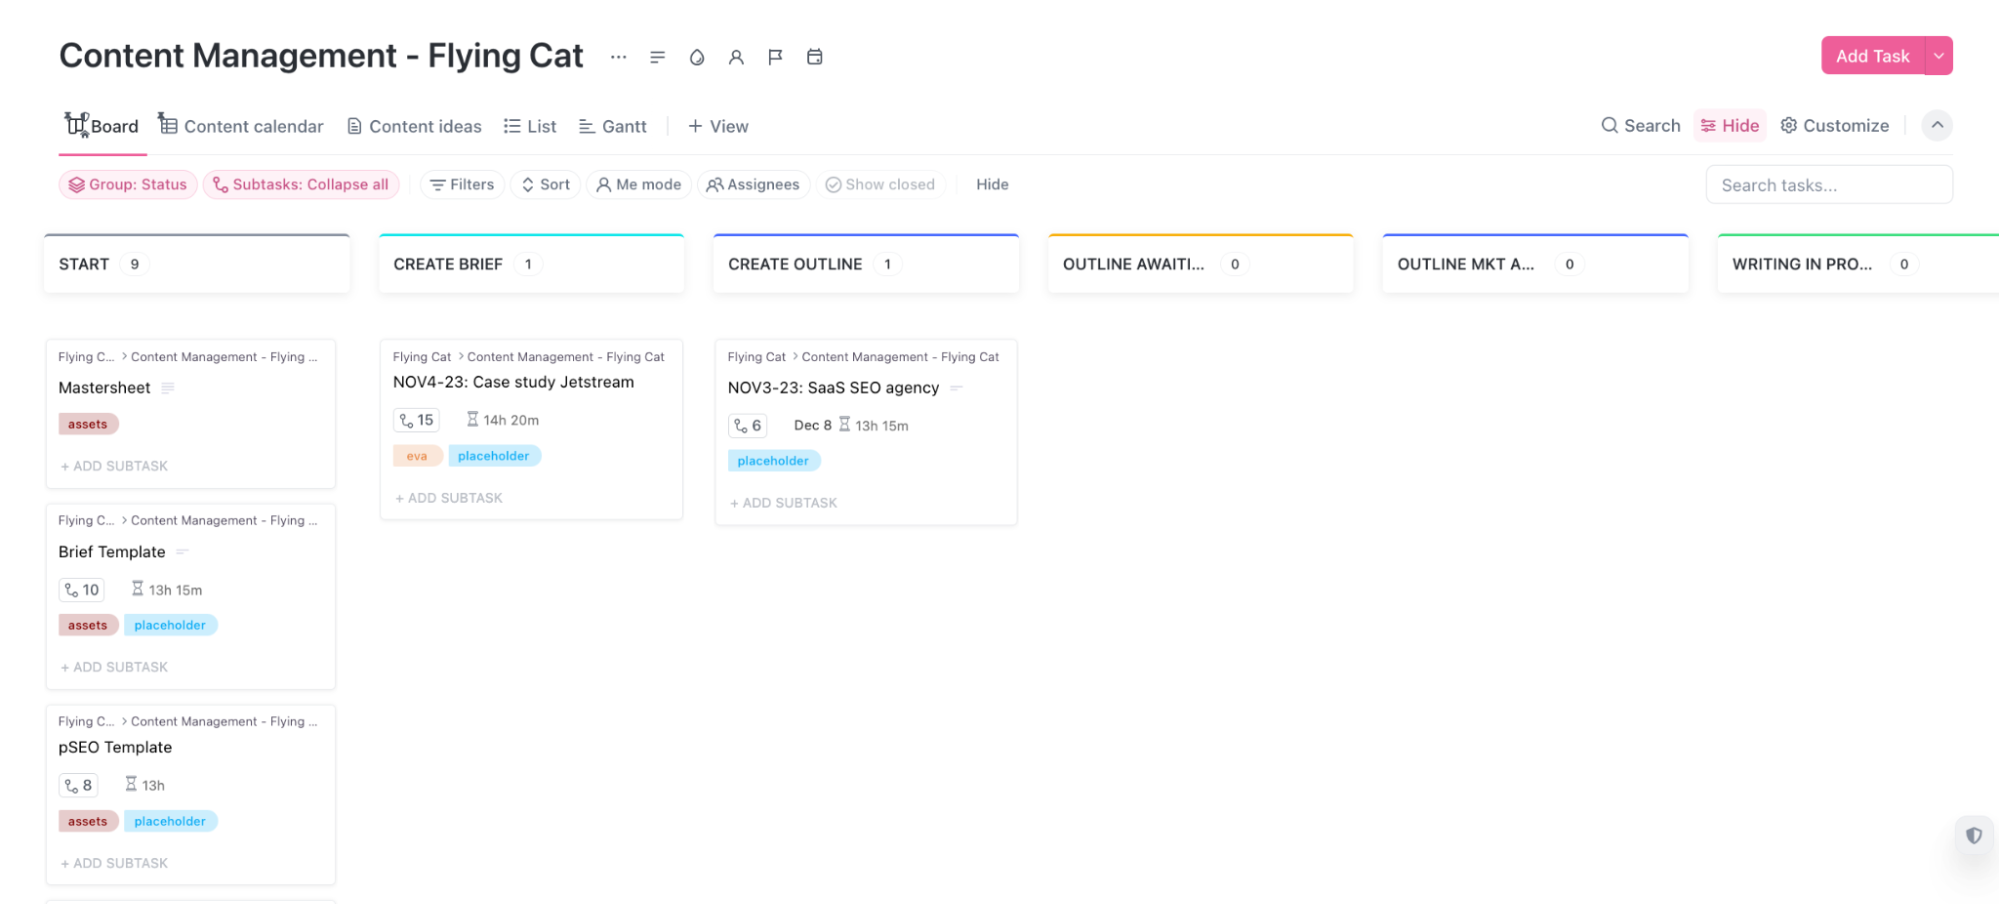
Using a project management tool ensures everyone is singing from the same hymn sheet.
Create a calendar and content pipeline to enable visibility of the bigger picture.
Encourage the team to communicate about each specific project within the relevant task (and not on Slack, for example) so that you don’t have to be constantly chasing for updates.
Using a tool allows you to really customize the workflow and skyrocket your production.
A way to really elevate your content production workflow is to use templates within your project management system, meaning that with 1 click you can deploy the same model every time you repeat the task.
Genius.
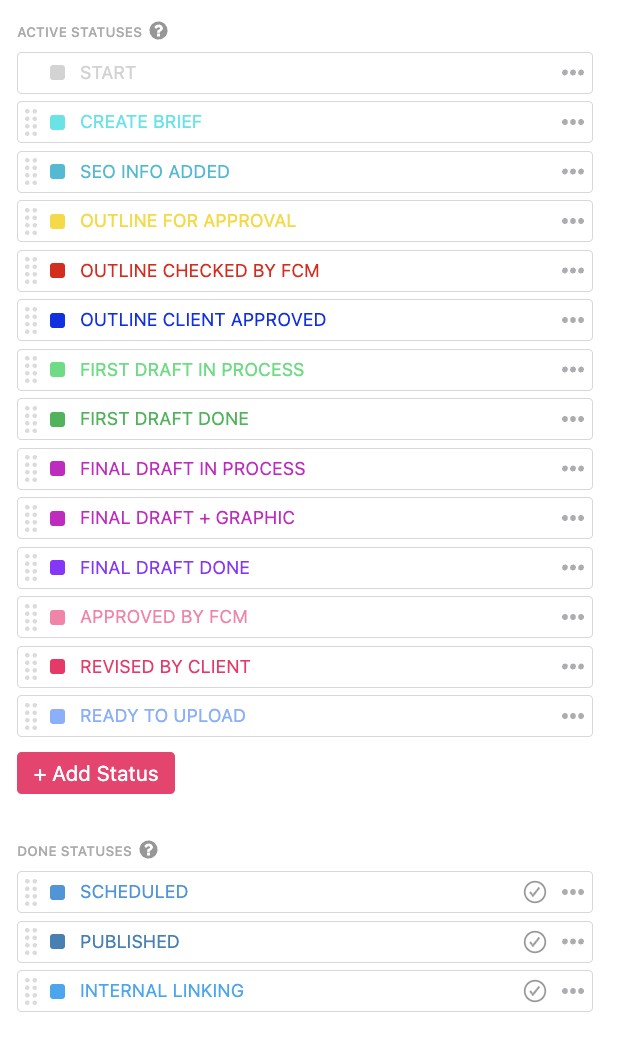
Let’s take a look at how that works. This video shows our workflow templates in ClickUp.
Create uniformed statuses and use a Kanban board view for easy visualization of each stage.
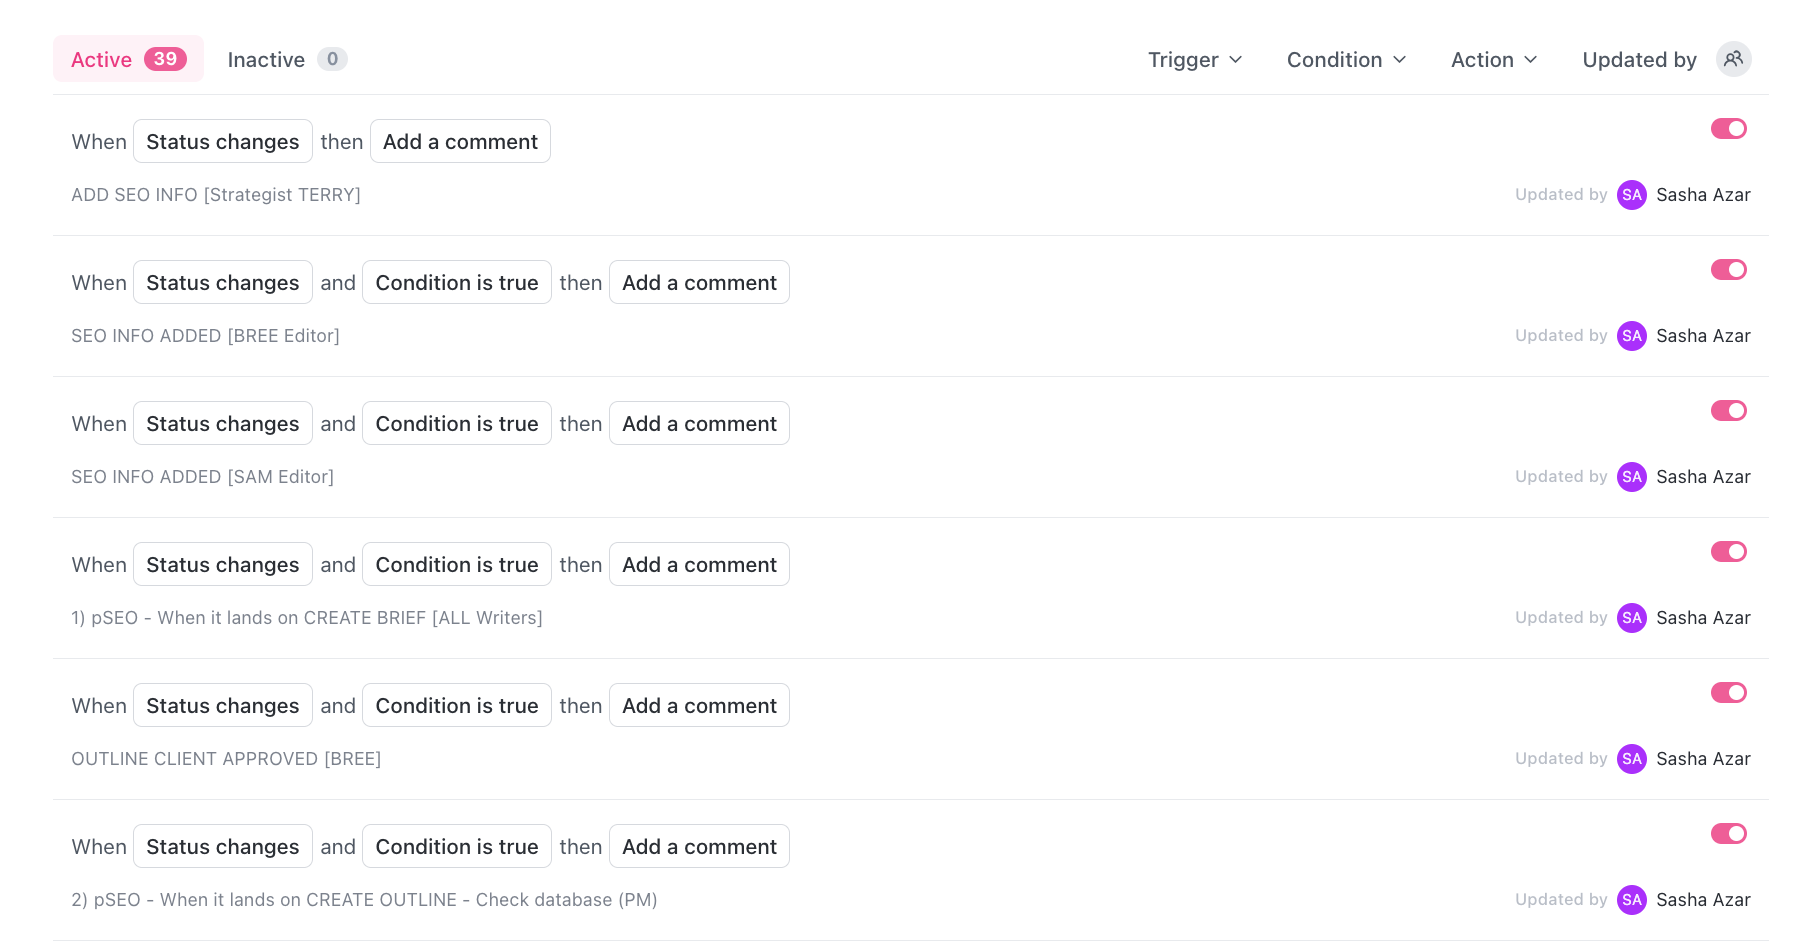
Automations
If you really want to get ahead in the content production game, make automations your best friend.
Even if at first it takes you more time initially to get them setup, you’ll be saving yourself hours, and therefore dollars, in the long run.
Most simple, repetitive tasks can be automated, freeing you and your team up to do work that requires brain power and not mindless computer power.
For example, use an automation to tag and comment to the next stakeholder, letting them know the piece is ready for their input.
You can use Zapier to set up Zaps for approvals, whereby once a certain status is selected in your project management tool, the client receives a message in Slack letting them know.
And you didn’t lift a finger! Clever, right?!
The more mental capacity you have, the more space you have to come up with your next big ‘break the internet’ move.
Top tips for managing your content workflow:
- Keep communication about the project inside the project management tool. This enables communication between all stakeholders to take place and be visible inside of each part of the process. The whole team knows exactly which part you’re referring to when you make a comment or update and it eliminates communication silos.
- Automate automate automate! If it’s done in the same way multiple times and doesn’t require much thinking, chances are you can automate it. Most PM tools have a built-in automations feature. You can also use Zapier to integrate tools and automate your workflows.
- Be sure to create a content calendar or pipeline as part of the process. You can also house this on ClickUp, or build it on Airtable for example. This makes sure you always know what you’ve done and where you’re going next. It’s a great way to be able to implement your internal linking strategy, too.
- Implement a regular workflow audit system to ensure you don’t continue to do things just because that’s the way you’ve always done them. The thing worse than not having a workflow in the first place is continuing to use a workflow that no longer serves you. You and the tools you use are changing all the time, don’t get left behind because you’re getting too comfortable and you’re not paying attention. Continual improvement is key.
- Tie KPIs to your processes to ensure efficiency. If you have a PM on your team, or maybe it’s you, create a KPI around projects being on time and on budget as part of their performance management, to encourage them to always be looking for ways to innovate and improve.
- Be sure to explain the workflow to each stakeholder and make sure they know what you expect of them. You can do the groundwork, set everything in place and drive this over the finish line, but team collaboration and understanding is key.
SEO & content marketing ops, ready to scale
Expertly crafted SOPs & templates for efficient processes and top-quality output.
